

Voice controlled lights with a Raspberry Pi and Snips
17 Jun 2018The objective of this article is to provide a step-by-step tutorial on how to setup a voice controlled light that you can interact with using trigger words.
This is what you will have at the end of this tutorial:
At this point, you probably already have some questions in mind that need to be answered before you can spend more time on this.
What kind of lights will I be able to control ?
Any light that you plug on a power socket.
What about my privacy? Will my voice be processed on the cloud ?
Everything will be processed locally. No server. No cloud. No data leak. Perfect resilience to internet outages.
Once setup, will it require an internet connection ?
No.
Will I be able to control something else than lights ?
Yes. This tutorial focuses on lights, but it is about controlling power sockets and not lights specifically.
Can I choose other trigger words than the ones in the video ?
Yes, and you will have to because these trigger words are customised to recognise your voice specifically.
Will I be lost if I’m not a hacker ?
No, every steps will be well documented assuming almost zero knowledge of software nor hardware.
How much will it cost me ?
Around 105 euros, all included, if you follow my setup which contains some spare pieces. You can probably go a bit cheaper.
How much time will it take to build ?
Between 1 and 2 hours.
Hardware requirements
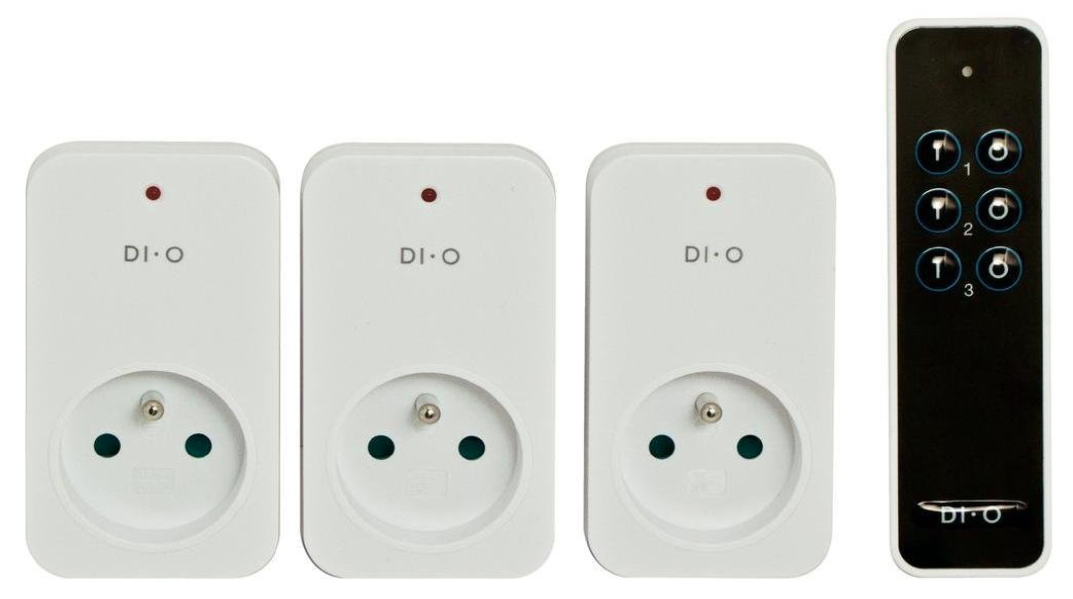
Connected plugs → 31,90€
The first thing you need is a set of 433MHz remote-controlled power sockets. We will use the DIO model from Chacon which works great and is cheap. Alternatively, you can use any other model, provided it uses the 433MHz frequency. If you go for the Chacon’s model, then it is probably a better idea to buy a set of 3 (~10€ / unit) instead of just one (~20€ / unit), as it is much more expensive and it is likely that, if everything goes well, you will want to connect more stuff in your home. 🙂
Raspberry Pi 3 → 36€
The Raspberry Pi 3 will be the main component of this setup, it is a single-board computer which have enough power for our use case.

Micro USB charger → 7€

Micro SD card 4Gb class 10 → 8€

PS3 Eye→ 9€
Surprisingly, this microphone is one of the best option for our use case.

Radio transmitter → < 10€
We will need a 433MHz radio transmitter. You will find tons of models online (just type “rf 433” on Amazon), the ones from kwmobile seem to be often used in this kind of setup. Note that in most cases you will get both a transmitter and a receiver though we only need the transmitter here.

Hardware setup
In all the following steps, make sure that the Raspberry Pi is not powered, otherwise you could damage the hardware and/or yourself.
Plug the PS3 Eye microphone
Simple as ABC, just use one of the USB plugs of the Raspberry Pi.
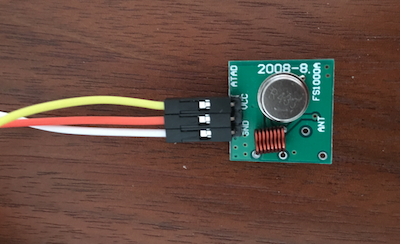
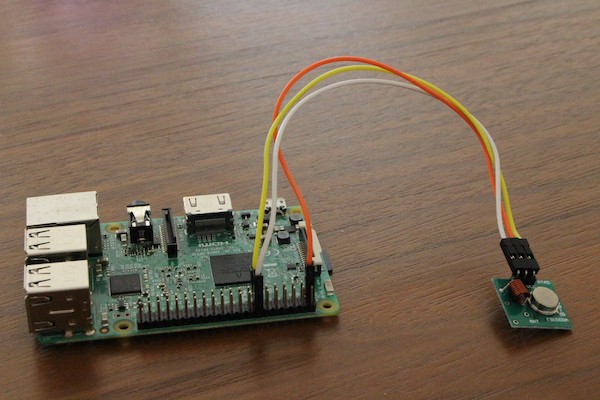
Plug the RF 433MHz transmitter
The radio transmitter has 3 pins: one power pin, one DATA pin and a Ground pin.
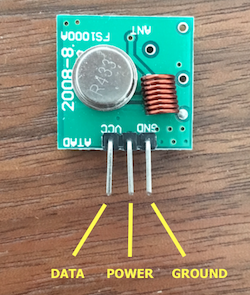
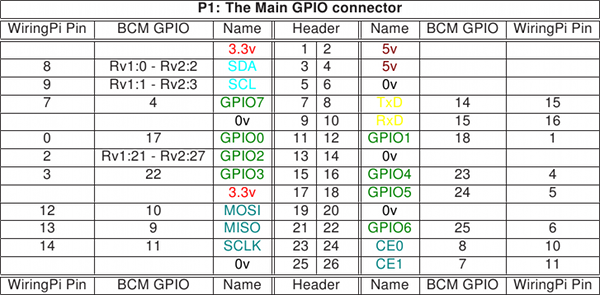
The power pin can be plugged to the remaining 3v3 power pin on the Pi (pin number 1 in the pinout schema). We will use the pin number 13 (BCM 27) for DATA, and pin 14 for the ground. We plug the transmitter to the Raspberry Pi using the female/female cables.
Software setup
First, we need to install the Raspbian Stretch Lite distribution on the SD card. Insert the SD card in your computer, check the instructions here, download the image and burn it on the SD card using Etcher.
Configure Wifi access
Add the following file wpa_supplicant.conf at the root of the boot volume of the SD card (do not forget to update the ssid and psk keys as well as the country key):
country=FR
ctrl_interface=DIR=/var/run/wpa_supplicant GROUP=netdev
update_config=1
network={
    ssid="Your WiFi network name"
    psk="Your WiFi network password"
}
Enable SSH
Enable SSH by adding an empty file ssh at the root of the boot volume on your SD card. Insert the SD card into the Raspberry. It will boot in about 20 seconds. If you run into issues check this.
You can now access your Raspberry from your computer using ssh pi@raspberrypi.local
Note: If you have several Raspberry Pi’s on the same network, it is probably a good idea to change their hostname or connect to them using their IP.
From now on, the next installation commands will have to be run from the Raspberry Pi, through ssh.
Setup the radio transmitter
In order to command the 433MHz radio transmitter, we first need to install WiringPi. It is a PIN based GPIO access library which will be used by our main program in order to access and control the DATA GPIO pin used by the transmitter. Here are the steps to download and install WiringPi:
$ sudo apt-get update
$ sudo apt-get upgrade
$ sudo apt-get install -y git
$ cd
$ git clone git://git.drogon.net/wiringPi
$ cd wiringPi
$ ./build
Now that WiringPi is installed, we can install the program that will replicate what the DIO remote control does when you press on and off. This program is written in C and largely inspired by this article (in French) from Idleman. Here are the steps to download the C program and compile it:
$ cd
$ mkdir lights_commands && cd lights_commands
$ wget https://raw.githubusercontent.com/adrienball/smart-lights/master/chacon_send.cpp
$ g++ -o chacon_send chacon_send.cpp -lwiringPi
This will generate a binary named chacon_send which we will use to send on and off signals to our DIO connected plug:
$ sudo ./chacon_send <wiringPI pin> <controller_code> <outlet_code> <on|off>wiringPI pin: this corresponds to the wiringPi pin number on which we plugged the DATA GPIO pin of the radio transmitter. We used the GPIO pin 13 which corresponds to the wiringPi number 2. If you used another pin, you can refer to the wiringPi mapping, or the table below, to get the corresponding number.
-
controller_code: this is a transmitter id number that we attribute arbitrarily to the RaspberryPi. It allows the power outlet to exclusively accept commands from this transmitter. -
outlet_code: this is a receiver code that you attribute arbitrarily to the DIO outlet that you want to control. -
on|off: the desired state of the outlet.
The transmitter/receiver synchronisation happens when you plug the power outlet. The Chacon power outlet contains a signal synchronisation module which means that, when you plug the outlet, there will be a short time of 5 seconds during which it will listen for any emitted signal and will remember its attribution codes (controller_code and outlet_code). Thus, for each plug you want to control, you will have to plug it and, within 5 seconds, send a signal using the command described just before (using a different outlet_code for each outlet).
The power outlet will make some characteristic “clic-clac” sounds to let you know that it has properly recognised and memorised your signal.
At this point, you can try the radio transmitter by plugging your power outlet and run:
$ sudo ./chacon_send 2 12325261 1 onIf everything went well, your power outlet should make a clic as it switches on.
Setup the microphone
Before setting up the audio, plug your USB microphone to the Raspberry Pi, and connect some headphones to the audio jack.
Start by creating an /etc/asound.conf file:
$ sudo nano /etc/asound.conf
pcm.!default {
  type asym
  playback.pcm {
    type plug
    slave.pcm "hw:0,0"
  }
  capture.pcm {
    type plug
    slave.pcm "hw:1,0"
  }
}
Now, let’s test the audio input. Execute the following command, speak into your microphone, and hit CTRL-C when you are done speaking:
$ arecord -f cd out.wav
Recording WAVE 'out.wav' : Signed 16 bit Little Endian, Rate 44100 Hz, Stereo
^CAborted by signal Interrupt...
Play the recorded sound to validate that your microphone is working:
$ aplay out.wav
Playing WAVE 'out.wav' : Signed 16 bit Little Endian, Rate 44100 Hz, StereoNote: If you have some troubles here, you may want to play with the db gain using the alsamixer command.
Setup the Snips platform
Now that the communication between the Pi and the power outlet is setup, we can move to the last piece, which is the most interesting one: make the lights react to your voice !
Disclaimer: I work at Snips.
To do so, we are going to use the Snips voice platform. It has the unique advantage to provide voice recognition directly on device, which means everything will run locally on the RaspberryPi, removing the need for a cloud based solution. Snips provides three main components:
-
Wake word detector: a component responsible for detecting a trigger word (think Ok Google or Hey Siri), that you can customise.
-
Automatic Speech Recognition Engine: this component converts your voice to text.
-
Natural Language Understanding Engine: it is responsible for extracting structured data from queries expressed in natural language. This piece is actually open source.
For our use case, we will only install the first component: the wake word detector:
$ cd
$ sudo apt-get install -y dirmngr
$ sudo bash -c  'echo "deb https://raspbian.snips.ai/$(lsb_release -cs) stable main" > /etc/apt/sources.list.d/snips.list'
$ sudo apt-key adv --keyserver pgp.mit.edu --recv-keys D4F50CDCA10A2849
$ sudo apt-get update
$ sudo apt-get install -y mosquitto
$ sudo apt-get install -y snips-audio-server
$ sudo apt-get install -y snips-hotword
$ git clone https://github.com/snipsco/snips-record-personal-hotword.git
$ cd snips-record-personal-hotword/
$ sudo apt-get install -y python-numpy python-pyaudio python-soundfile
Recording the wake words
You are now ready to record you personal wake words. You will need to record at least two distinct wake words: one will be used to switch on the light, and the other to switch it off. You can have more than two if you want to support some variations.
Run the following command, replacing your own wake word name instead of your_hotword_name, and follow the instructions:
$ sudo systemctl stop snips-audio-server; python script_recording.py <your_hotword_name>You should have to record three samples before the model is saved. At this point, check where your wake word model has been saved as you will need this information afterwards.
If you have some troubles recording your wake word, please check the Snips documentation.
Now it’s time to test the model and adjust the sensitivity accordingly. First, run this command:
$ sudo systemctl stop snips-hotword; sudo systemctl start snips-audio-server;Then run the following one to launch the wake word detector:
$ snips-hotword --model <path_to_your_model>=<sensitivity>As per Snips documentation:
Once you are happy with your settings, follow the steps described here to finalise the personal wake word setup.
Make sure that you have correctly restarted the snips-hotword service once you are done:
$ sudo systemctl restart snips-hotwordSetup the python handler
Finally, the last step of this tutorial consists in plugging everything together, using a small python handler.
This handler relies on a python library, paho-mqtt that we need to install beforehand:
$ sudo apt-get install -y python-pip
$ sudo pip install paho-mqtt==1.3.1
Then, download the handler:
$ cd
$ cd lights_commands
$ wget https://raw.githubusercontent.com/adrienball/smart-lights/master/snips_handler.py
Make it executable:
$ chmod +x snips_handler.pyNow, edit the handler file and update the HOTWORDS_ON and HOTWORDS_OFF variables with the names of the wake words you recorded, e.g.:
HOTWORDS_ON = {"illumino", "lumos"}
HOTWORDS_OFF = {"obscuro", "nocte"}
By default this handler is sending the following commands:
./chacon_send 2 12325261 1 on
./chacon_send 2 12325261 1 off
Thus, if you used another wiringPi pin or outlet code (see radio transmitter section), you have to update this part of the handler as well.
Finally, we are going to convert this python script into a systemd service. Create the smart-lights.service and update the file accordingly:
$ sudo nano /etc/systemd/system/multi-user.target.wants/smart-lights.service
[Unit]
Description=Smart Lights Service
After=multi-user.target
[Service]
Type=simple
ExecStart=/usr/bin/python /home/pi/lights_commands/snips_handler.py
Restart=on-abort
[Install]
WantedBy=multi-user.target
Now, start the service and check its status:
$ sudo systemctl start smart-lights
$ sudo systemctl status smart-lights
● smart-lights.service - Smart Lights Service
   Loaded: loaded (/etc/systemd/system/multi-user.target.wants/smart-lights.service; linked; vendor preset: enabled)
   Active: active (running) since Sun 2018-06-17 12:52:07 UTC; 1min 34s ago
 Main PID: 11040 (python)
   CGroup: /system.slice/smart-lights.service
           └─11040 /usr/bin/python /home/pi/lights_commands/snips_handler.py
The service should be up and running, and it will restart automatically each time you reboot your Raspberry Pi.
Congratulations! That’s it! If you reached this point, then everything is setup and you can now enjoy interacting with your smart light !